Welcome to the Caboodle of Know-Hows!
A Don't Starve and a Don't Starve Together forum of ideas of the discovered and for the undiscovered. This forum is a showcase of veteran knowledge and experiments fitting the different dynamic mechanics of the world of Don't Starve and the Don't Starve Together.
Disclaimer
For beginners who are starting to play the game, this forum page isn't your greatest bet to start the game but rather if you're experienced enough to survive the difficult learning curve and immediately start your indefinite survival, the Caboodle of Know-Hows is your forum place to learn and spice up your indefinite survival.
The forum will be on construction and improvements indefinitely and along ideas will be documented in a rather understandable way.
Ragtime Music
"Dragonfly Scale Farm"
"The scale of the fiery conflagration of the beast, now I own."
A forum topic had opened for a question of an efficient way of farming dragonfly scales. This pondered me about how inefficient the gunpowder tactic was. So I came up for a number of research with the help of the Don't Starve wiki, @Asparagus' bunnyman count and my knowledge of pathfinding behaviors.
Thanks to the Don't Starve community wiki and @Asparagus ' shenanigans and his low frame rate videos about fighting the Dragonfly. I came up for a way of an effective scale farm.
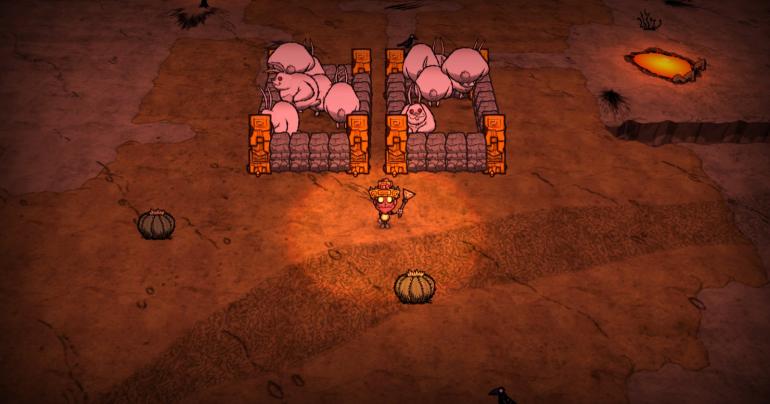
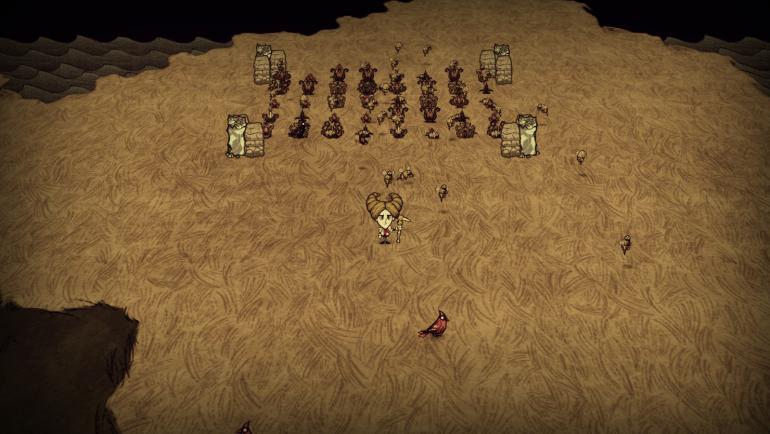
May I represent the Dragonfly Scale Farm
Screenshots:
Requirements:
This contraption uses homeless bunnymen (  from
from ) encased in an enclosure of walls,fences and gates (


 ), a small pathway for you and the dragonfly to get in between, a melee weapon of choice, armor of preference (
![]() ) and an optional a resurrection item and medications (
) and an optional a resurrection item and medications (

 and
and  ).
).
I'll explain the technicalities
The Dragonfly ( ) has a mechanic whenever if you deal more than 1250 damage, it will go into a forced knock-out. And if you could deal 2500 damage she will drop a scale (
 ). She will not drop anymore scales () when she's stunned again but straying it away fro its location and going back refreshes and repeats itself. Exploiting this kind of behavior, we would use a bunnyman ( ) because it doesn't have a kiting behavior, has an increased damage and has hostility towards monsters and giants. Using 12 bunnymen will give out in in every second, a damage out of 480. Multiplying it by 5 seconds will successfully give 2400, more than enough to knock it down.
Another thing involve is its own attack priority. Dragonfly's #1 hit list will be the player, second will be the mobs itself. This makes up for safety of your homeless bunnymen as you're the meat shield. Unless in cases of situations, but it's ideal situation that you'll achieve. The walls are to limit the bunnymen's movement and to stop them from wandering and follow the dragonfly during his lavae spawn phase.
For the operation of the farm:
-
Lead the Dragonfly (
![101?cb=20140402193408]() ) towards the narrow hallway in order for the bunnymen (
) towards the narrow hallway in order for the bunnymen ( ![58?cb=20130522054019]() ) to attack the Dragonfly whilst your character receives the damage.
) to attack the Dragonfly whilst your character receives the damage.
- Once knocked out due to the overwhelming damage output, hit with all your might to drop the scale.
-
When the Dragonfly (
![101?cb=20140402193408]() ) wakes up from its forced sleep state, immediately remove yourself from the bunnymen (
) wakes up from its forced sleep state, immediately remove yourself from the bunnymen ( ![58?cb=20130522054019]() ) and follow the Dragonfly. Dodge incoming lavae (
) and follow the Dragonfly. Dodge incoming lavae (![150?cb=20160720025737]() ) attacks and anticipate the fifth lavae spawn. Then lead the Dragonfly as far from her set piece in order for her to fully respawn.
) attacks and anticipate the fifth lavae spawn. Then lead the Dragonfly as far from her set piece in order for her to fully respawn.
Thanks for reading!
Author:
The original thread
"FLower Farming"
"It is buzzing with activity."
Flower farming were once discovered by the forerunners of the Don't Starve society long before. A simple mechanic upon stumbling the behavior on homeless worker bees. Pollinating from flower to flower until it reaches the maximum threshold of six flowers, a homeless bee now once at rest produces a elegant blossom. But there comes dilemma about this measly simple mechanic.
In instances, Don't Starve players may create flower farms in an unorthodox manner. Meaning flower farms tend to be erratic and somehow unpleasant for players who have the love of symmetry but only to face uneveness on their sights. Somehow it takes a lot of buzzing by the bees by how far they would go to pollinate from flower to flower. The same instance for players picking flowers from point to point.
Here I'm about to show to all of you a screenshot that would take flower farming in a tidy manner.
Screenshots:

Requirements:
The construction uses butterflies (  ) acquired from flowers using a bug net, walls or fences () of different variations crafted by different ingredients, and as well as bees (
 ) acquired from beehives using a bug net.
This flower farm utilizes freedom on how much flowers planted using butterflies which equals to the amount of homeless bees (e.g 40 butterflies = 40 flowers = 40 homeless bees) you want to use. The corner walls/ fences () for the flower farm signifies any flower inside must not be picked rather only the flowers outside the pollination chamber. This gradually helps the homeless bees and makes the process quicker due to the distance being nearly for every flower.

Procedures:
There are certain procedures needed to create and operate the farm as functional as it should be.
For the creation of the flower farm
-
There must be no natural flowers (
![latest?cb=20131201192756]()
![latest?cb=20130410055803]() ) in the vicinity due to how uncontrollable the homeless bee's behavior (
) in the vicinity due to how uncontrollable the homeless bee's behavior (![latest?cb=20121215144349]() ) is. As well as to guarantee the flower (
) is. As well as to guarantee the flower (![latest?cb=20131201192756]()
![latest?cb=20130410055803]() ) produced as is.
) produced as is.

 ) in the vicinity due to how uncontrollable the homeless bee's behavior (
-
For evil flower (
![latest?cb=20131201192756]() ) farms, I would highly suggest creating them upon checkered flooring or even savannah turf
) farms, I would highly suggest creating them upon checkered flooring or even savannah turf ![latest?cb=20130314191530]()
![latest?cb=20130109102146]() due to their aid on your sight towards those moments of insanity.
due to their aid on your sight towards those moments of insanity.

 due to their aid on your sight towards those moments of insanity.
- Flower farms must be constructed on a location where you wouldn't encounter always for it to not function.
For the operation of the flower farm
- If you are done with your flower farming I would highly suggest to put all of the homeless bees to sleep either by the use of the pan flute or submerged into darkness. Pick the flowers left over and immediately go far away in order for the chunk to be unloaded. (basically they are on a time freeze) - Clean way of finishing the job.
- You can leave the area immediately in order to be unloaded but expect picking the left flowers immediately in order for the homeless bees to go back to the pollination chamber
- Pick the flowers outside the pollination chamber and not what's inside. And still continue picking the flowers outside in order for the bees to go still on the pollination chamber.
This farm can yield on petals and dark petals (
 ) for manure (
 ) by using a sole Werepig (
 ) and rot (
 ) if left over time for your farming needs, garlands (
 ) for all days, and dark petals () to be refined to produce nightmare fuel (
 ). In occasion butterfly wings and butter (
 ) if you're up to butterfly farming but it is not advisable though and a different flower patch would be a better solution for that one.
I hope you're fluttering with Don't Starve knowledge and thank you for the support.
Author:
""
"Hound Culling"
A carnassial carnivore of one big pack are the root of danger in dwelling on the open surface but hounds do hold vitality and essential upbringings with a feeling of resentment. Now this will help you tame the beast by beating their flesh out until they come in a pile of dead bodies for our sweet contentment.
This introduces contraptions for an efficient hound culling techniques that involves numerous mechanics for it to be effective. An essential element titled "Path Finding Behaviors" would be of help in construction.
Requirements:
It uses legitimate and illegitimate obstacles () (![]() ) , combat weapons and armor (
) , combat weapons and armor (![]() ), rations and for automation entities to do you your will in benefit (
), rations and for automation entities to do you your will in benefit ( ). It is essential to capture a Varg (
 ) using transportation magic (
 ).
).
Procedures:
Construction:
- Simply establish an area to your liking where you would start to build. Construct and develop the area with using all the needed requirements. It must be constructed to a place where you'll never take to travel upon.
Hunting:
-
Hunt yourself a Varg (
![160?cb=20140403074519]() ) by tracking it down (
) by tracking it down (![latest?cb=20160516172626]() ). It may take time to do but once found, with the help of your transportation magic (
). It may take time to do but once found, with the help of your transportation magic (![latest?cb=20130626173341]()
![latest?cb=20130717083122]() ) teleport it to the encased enclosure. The structure must be finished first before doing so. But manually caging the Varg can be possible but would take bruises and in some cases character death.
) teleport it to the encased enclosure. The structure must be finished first before doing so. But manually caging the Varg can be possible but would take bruises and in some cases character death.
 ). It may take time to do but once found, with the help of your transportation magic (
Operation:
-
Once the Varg (
![160?cb=20140403074519]() ) is on place, you could manually fight them with ease or automate the hounds (
) is on place, you could manually fight them with ease or automate the hounds (![105?cb=20140709235057]()
![105?cb=20140709235037]()
![105?cb=20140709235116]() ) using entities on the neutral to hostile state (
) using entities on the neutral to hostile state (![111?cb=20160519052537]() ). As long as you benefit.
). As long as you benefit.


 ) using entities on the neutral to hostile state (
-
If you're done, to stop the farm, you must put the Varg (
![160?cb=20140403074519]() ) to rest using sleep darts, pan flutes, napsacks and Sleepy Time Stories (
) to rest using sleep darts, pan flutes, napsacks and Sleepy Time Stories (![latest?cb=20121215201221]()
![latest?cb=20121216103003]() ) in order to make it inactive and get out of harm's way.
) in order to make it inactive and get out of harm's way.

 ) in order to make it inactive and get out of harm's way.
This could lead to infinite monster meat ( ) for culinary uses, infinite hound's teeth (
 ) for your crafting needs, and infinite red and blue gems for your magical shenanigans (
 ). I hope this help you and will help for those days to come. Thank you for your time.
Author:
"Overheating & Freezing"
""
Given the amount of time you spent playing Don't Starve (Together), you've probably wanted ways for a quick temperature rise or drop due to the fact that you wanted to retain your character's body temperature long enough before beginning to freeze or overheat from the global temperature. It is a practical annoyance that could lead to certain death if not immediately treated but there would be an easy way of of a quick rise and temperature drop.
This uses two campfires and fire pits (
 ) or even endothermic fires and its fire pit counterparts (
 ) to quickly manipulate your character's temperature to rise or fall in order to use other utilities and clothing to maintain body temperature and reduce temperature loss of the character.
A maximum of 2 and if added more will have no guarantee effect and will be only plain redundancy and can still give off quite a significant amount of heat/ or even chillness even not on their maximum output. But it is not limited only to these but other sources of heat and cold which this applies to almost all of the given.
These are the following:
These emit heat


In order: Campfire, Fire Pit, Extra-Adorable Lavae, Dwarf Star, Scaled Furnace, Magma Pond
These emit cold
 +
+
In order: Endothermic Fire, Endothermic Fire Pit, Polar Light, Moonbase + Mooncaller's Staff
This can lead to temperature "machines" for a quick temperature increase and decrease, even portable and non-portable temperature machinery. Only for your character's bodily needs whilst giving longevity before your character needs the warmth or even coolness of the fire.
"Path Finding Behaviors"
"They've gone right into my trap."
In Don't Starve and in Don't Starve Together knowing certain behaviors of entities can be crucial to create meticulous contraptions that provides advantages for the player and now I'm here to explain it bluntly as possible.
On path finding there are two categories of obstacles in order for all of you to understand: which are legitimate obstacles and unintended obstacles. Legitimate obstacles are obstacles intended and follows an open path if there is any but if there is any path that is closed it doesn't follow and goes straight to the direction in rationality. Unintended obstacles are structures that could still block but doesn't have what legitimate obstacles can do.
Mobs follow the nearest legitimate pathway for them to reach their target unlike giants which of course doesn't recognize and instead demolish the obstacles on their own path. Simply put for the giant's description they make their own path for themselves.
"Light It Up"
""
Lights are essential to humankind as it provided us protection from darkness and what lies beyond. Just like in Don't Starve and in Don't Starve Together they are used as illumination for threats coming from the dark and from her as well. Here is where it will show conventional and innovative ways that functions as it is in dangerous or peaceful situations
Safe Lightings
These are kind of lightings that doesn't give any harm whatsoever to the character and the player.
Examples:

Cautionary Lightings
These are kinds of lightings that could can cause harm to the character and the player in exchange for light.
Examples:
"Poor Man's Honey Farm"
Note:
As the title says this a low yield way of acquiring honey. Use this if you're restricting yourself or even challenging yourself to acquire honey without removing the beehives.
If you're up to the challenge of imposing self limitations either through modding the game as you please or even simply setting self limitations to yourself this kind should help you to work out to get honey especially on the long term with as much ease as possible.
Requirements:
The requirements would take a killer bee hive ( ) or even a gigantic beehive (
 ), and optionally a beehive (
 ) if you're not restricted in order to do this kind of feat. The tools used would be a hammer (
 ), a weapon of choice and armor (
![]() ) and any kind of entities which are hostile and neutral in nature and not even passive ().
) and any kind of entities which are hostile and neutral in nature and not even passive ().
Procedures:
For the Gigantic Beehive:
Base Guideline
A stream of Honey flows out of the hole near the top, and hammering the Gigantic Beehive twice will reduce the size of the stream and cause 1-2 Honey and sometimes 1 Honeycomb to drop onto the ground, which can be picked up. Honey can be repeatedly harvested until the stream is gone, without spawning the Bee Queen. Every 5 segments of the Day, the honey stream will grow, and can be hammered again to receive more honey.
Steps:
-
With the requirements prepared, hammer the Gigantic Beehive (
![84?cb=20161104185804]() ) either slowly or fast enough to trigger the Queen (
) either slowly or fast enough to trigger the Queen (![72?cb=20161104185735]() ).
).
 ).
).
-
When the Queen (
![72?cb=20161104185735]() ) flies out immediately remove yourself to the vicinity but if not you could collect the drops once it's done
) flies out immediately remove yourself to the vicinity but if not you could collect the drops once it's done
- "All is well is in a loop."
For the Killer Beehives and Beehives:
Base Guideline
Killer Beehives and Beehives function as a home for both same entities but they do have their own differences. Beehives house bees and killer bees in defense while killer beehives house killer bees and in the vicinity of it will alarm and the remaining amount of killer bees inside to go after the character.
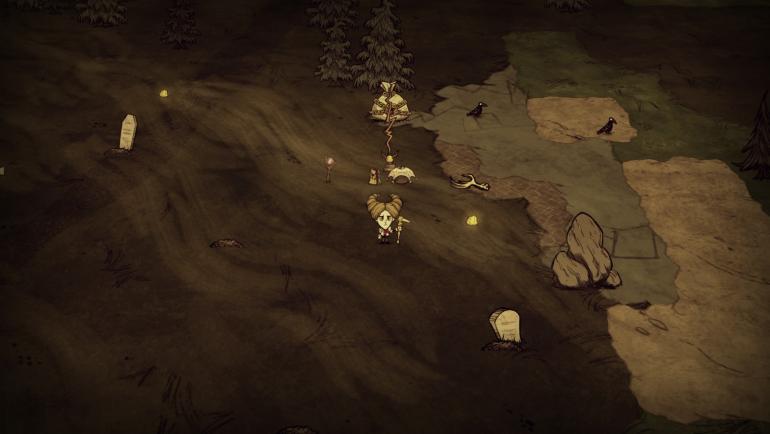
"Sanity Stations"
Well if you're a Wickerbottom player, you know the struggles of shadows trying to kill you and the hardships of filling out her sanity slowly and surely by that Tam'o shanter you got from dear old Mactusk. Well what if there's quick way of sanity regeneration in under two minutes that your Tam can't do on two minutes? Well then again, it is possible using entities walled together and then lured from the bait set up. Feed them with morsels, eggs and carrots and your 2 minutes to reach maximum sanity begins.
Another thought of mine especially is about the Bee Queen Hat, which converts insanity aura into half of the sanity aura to be gained from it. Bunnymen, rabbits, treeguards and werepigs are some safe examples to get yourself free sanity. Evil flowers too are effective for being stationary and compact.
And if you want the opposite, it works on that side, just be careful.
For the sanity topic refer to the two websites in order to fully understand:
http://dontstarve.gamepedia.com/Sanity
http://dontstarve.wikia.com/wiki/Sanity
Here are some examples of sanity machines that can be used.
Examples:
A front view of the sanity machines which uses the befriending mechanic which produces sanity aura and or insanity aura (for the bunnymen,rabbits, and werepigs)

A back view of the sanity machines and a bunnyman enclosed onto four walls as a possible way to remove the friendship by holding meat on your inventory.

A square field of flowers formerly but turned currently as evil flowers.
An enclosure of Treeguards with the use of end tables and chess pieces
Came from my topic:
Something new:
A discovery of mine about sanity popped out of my own noggin and I thought about the harmless End Table (). This furniture which is seemingly useful in terms of decoration and mind boggling experiments had made me thought up something new and refreshing to the community.
Arranging the end table using petals can give an instant sanity boost of five and flowers on the end table do wilt over time but flowers on the end table could be wilted manually with the use of fire. Together with some fire extinguishing methods ()
"Shroom Skin Farm"
Are you in hopes in having to acquire the legendary skin of the fabled Toadstool not just once but also infinitely. Well you're in luck! This strategy is in hope for you to have a way to delicately farm such roughly warted skin.
Required items:
This strategy requires the use of lureplants or even spider dens (), and ice staves () for the first example. The second strategy uses butterflies () in order to have planted flowers (), Star Caller Staves (), and Ice Flingomatics.
Universal requirements such as combat weaponry and armor (), and rations should be of suffice and it is of need for a prolonged way of a steady supply of shroom skins.
Procedures:
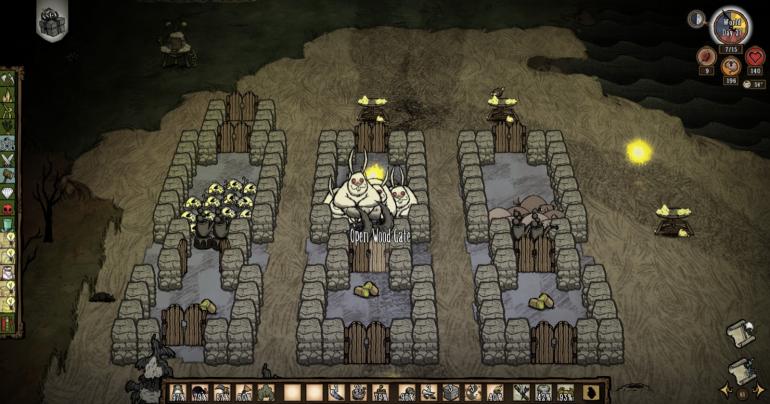
"Strange Interactions with the Moonstone"
Have you gone up thinking how tedious mining specific boulders in order to get moon rocks? But in the end, it is not enough to make yourself the required building materials to build your masterpiece. Well I'm about to show you a rather strange mechanic onto place.
The Moonstone is a natural occurring structure that resides in a part of a forest on some grassland turf with seemingly suspicious petrified specimens covered in moon rocks. This structure could change one of the staves in the game in order to be converted into the Moon Caller Staff. On the night of the full moon, under a fully repaired Moonstone, you insert a Star Caller Staff and defend the Moonstone in incoming attacks of waves of Werepigs and Hounds.
But curiosity take over and a little experiment was shown by me before that led to the discovery.
This discovery of mine was once the first documentation of this strange mechanic fresh as it was from its beta updates before, following to new threads exclaiming the same idea with pictures and videos of Don't Starve players demonstrating this kind of idea.
Requirements:
Note:
All of this requires a great amount of resource to spare and construct so this kind of piece of puzzle construction are for you if your surviving indefinitely .
It requires two following mobs. The pigmen () , and the hounds () as the essential factor in order to acquire moon rocks. Walls (), gates (), or even fences and oddly enough entities or structures that could block in general. An essential item, the Star Caller's Staff is a must need. A repaired moonstone by repairing by moon rocks is also a must as well.
Procedures:
Construction:
- Simply establish an area to your liking where you would start to build. Construct and develop the area with using all the needed building requirements.
Preparation:
Operation:
"The Loot Stash"
"The dark secrets of the Loot Stash has been revealed."
The loot stash upholds its meaning to be a white sack locked in chains bound by the Klaus' lock and key. Which brings forth upon opening presents and giving the Winter's Feast cheers. Shiny baubles, winter's feast lights and food, gold, charcoal, wax paper, forbidden knowledge, and the skins of the notorious giants. But is that the one and only use of the loot stash? Just for that single purpose?
Now I am willing to introduce and change your own views rather simply this bag of loot to be a container of preciousness but something more. But we are in need of suitable of equipment in order to produce this one of a kind feat that you never ever seen before the Don't Starve world.
Required items:
The following items to create this feat will be using telelocator staves ( ), deer antlers 

 ), electric-resistant clothing (
 )
)
and as a replacement for clothing, a lightning rod ( ).
).
Procedures:
- Bother the two-horned key keeper by fitting Deer Antlers acquired from migratory No-Eyed Deers by slamming themselves onto any different kind of trees. As you're prepared for the situation by erecting lightning rods and electric-resistant clothing.
- Once on sight, equip the telelocator staff on your hand slot and immediately teleport Klaus.
- Once teleported, either follow the loyal Gemmed No-Eye Deers or stay on that specific location. Once the background music for fighting Klaus dwindles into oblivion the Gemmed No-Eye Deers becomes normal. If the background music still continues and the Gemmed No-Eye Deers became normal No-Eye Deers on sight, immediately run far away until Klaus despawns itself.
This set up can provide red gems and blue gems () from the freed No-Eye Deers (
 ), also that they provide meat (
 ) upon killing them. Additionally some couple of bone shards (
 ) resulting from unlocking the loot stash for your farming needs and purple gems (
 ) upon crafting the two together and an optional situation wherein if you have a fellow WX-78 () in the brink of needing an overcharge.

Now you can fill those deserted biomes with life by repeating the procedure in which produces an amount equal of the telelocator staves used. Practically an endless of free roaming deers that were freed by the cruel key keeper of the stash.
"The OverCharger"
""
It is frustrating as a lone WX-78 player not to have lightning strikes to overcharge you with a ridiculous amounts of speed, average amounts of light, an instant health boost with some penalties of instantly sanity drain. But don't fret as it is still possible but may require large amounts of resources to create a simple feat. There are different ways to do it but on different levels of aspects needed to structure it as solid as possible.
"Toadstool Solo Elimination"
"Willow's Happy Place"
"No one could understand me."
Willow in honesty doesn't have uniqueness due to the fact Klei Entertainment made complete revisions which removes her own "fire" out of Don't Starve Together. Making her stand point in Don't Starve Together as a beginner character while removing certain aspects that makes her truly Willow. But an aspect of her can be unique and I'm here to show to you it.
In the character selection screen, Willow defines her love and affinity to fire. Whenever she's near a fire whether controlled or even uncontrollable, Willow gains sanity regeneration. It even before existed in the sister version of Don't Starve Together and there born the easiest way for Willow to regenerate her sanity into seconds. But fire mechanics in Don't Starve Together are different towards the sister version of it and how would you do it? Well that's why I'm here to tell all of you reading.
Unlike in Don't Starve where fire immediately spreads fast, fires in Don't Starve Together has a mechanic called smoldering wherein in a certain amount of time it will ignite into flames but can be stopped before igniting. But there is a workaround in order to achieve the same effect like on the sister version.
Requirements:
This uses a depending amount of burnables that can last long enough right before they turn to ashes( ) exclusive to Willow; her own lighter(
 ) or even a torch (
 ) and a fire-extinguisher (


 )
)
I would highly suggest to add this mods (any of the two works):
http://steamcommunity.com/sharedfiles/filedetails/?id=817161265&searchtext=
http://steamcommunity.com/sharedfiles/filedetails/?id=873350047&searchtext=
Procedures:
-
With the burnables (
![latest?cb=20121215201259]() ) prepared, you must stack the burnables individually using the mod highly suggested only in one place. I would suggest the quantity to be stupendously high in order for the burnables not even turn into ashes.
) prepared, you must stack the burnables individually using the mod highly suggested only in one place. I would suggest the quantity to be stupendously high in order for the burnables not even turn into ashes.
- Once done, optionally place down your ice-flingomatic (
)
but you could even use other fire-extinguishing methods () but likely an area of effect.
-
Light the individual stack of burnables with a torch or even a lighter (
![latest?cb=20130625202429]()
![latest?cb=20121216162140]() ) and it will quickly ignite due to how close they are to each other. You could either stand on the fire using a scalemail or stand a few steps still without getting burned to death.
) and it will quickly ignite due to how close they are to each other. You could either stand on the fire using a scalemail or stand a few steps still without getting burned to death.
-
Remember and be alert yourself and extinguish it immediately once your sanity (
![latest?cb=20130410165150]() ) is full.
) is full.
 ) is full.
Note:
Any burnables can be used as long as it has the same burn time of a board.
Thank you for reading and I hope it will satisfy -somehow- Willow's fire after all.
Author:
Topic Template:
""
""
Required items:
Procedures:
"Under Construction"
Request for help on your ideas as well. It's hard myself to motivate working on this thread so whoever wants to help me post your work here only and I'll edit some of it. For courtesy the status "Author" will be given if you posted a post whether new or within my knowledge. Thank you in advance!